


I have a little boy running circles around me getting into everything so hopefully I can present this in a way that shares my experience.
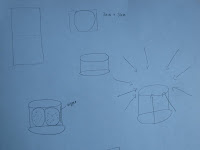
I would say on average the majority of outsiders don't understand what goes into sessions and how much work and planning takes place. As a result, I've decided to start making posts here and there that shows what goes on behind the scenes from props to editing. This post will be devoted to a new newborn prop. Props can truly make or break a photo session. The appropriate placing, size, color and texture all come into play. Props for newborn shoots include blankets as back drops, hats and other hair pieces and something for the baby to lie on. For the past year I've been using a Boppy pillow. While it was better than nothing my hands were really tied when it came to posing. I did some research and found the ultimate newborn prop. It's called the newborn posing beanbag or newborn posing ottoman. Basically, a glorified, flat top bean bag with a price tag of $95 pre beans and $107 post beans, neither with shipping included into the price. It allows you to have a better viewing field of the newborn. It also allows you to manipulate the beans that are within bags to help get those super cool little poses. I wasn't completely sold on this prop, having never used one and had other things I'd rather drop $100+ on. Soooo, I decided to venture out on a DIY newborn posing beanbag with the smallest amount of funds possible. My intention was to take photos along the way detailing this journey but things got a little hairy and no photos were taken. I am a hands on learning. Written instructions don't reach me like giving me a picture to follow. I read the details of this posing beanbag and cogitated while making sketches. Below is a list of what I hoped to create.
A flat top, round prop to be as close to the "real" thing as possible
2 bags inside filled with beans
Zipper in the side or bottom so the "sleeve" can be removed and washed
Something you must know before I get much further into this, is I am not a seamstress. I can sew and make basic things, but beyond that I'm out. I went to our new JoAnn's Fabric store in Clarksville and purchased two yards of black woven cotton fabric. It was the most sturdy cotton I could find. There I also bought a zipper. I then went to Miejers and purchased a bag of beanbag beans. I went home and got to work. I'm such a perfectionist that I mulled over several different ways to cut out my circle but opted for the longest way possible to insure a perfect circle. Here is my sketch paper. Not wanting to get my DSLR out while chasing after my little one, I took pictures with my pocket camera (Canon Powershot) so the quality isn't the greatest. **click to enlarge**


Updated images using this posing bag.


I would say on average the majority of outsiders don't understand what goes into sessions and how much work and planning takes place. As a result, I've decided to start making posts here and there that shows what goes on behind the scenes from props to editing. This post will be devoted to a new newborn prop. Props can truly make or break a photo session. The appropriate placing, size, color and texture all come into play. Props for newborn shoots include blankets as back drops, hats and other hair pieces and something for the baby to lie on. For the past year I've been using a Boppy pillow. While it was better than nothing my hands were really tied when it came to posing. I did some research and found the ultimate newborn prop. It's called the newborn posing beanbag or newborn posing ottoman. Basically, a glorified, flat top bean bag with a price tag of $95 pre beans and $107 post beans, neither with shipping included into the price. It allows you to have a better viewing field of the newborn. It also allows you to manipulate the beans that are within bags to help get those super cool little poses. I wasn't completely sold on this prop, having never used one and had other things I'd rather drop $100+ on. Soooo, I decided to venture out on a DIY newborn posing beanbag with the smallest amount of funds possible. My intention was to take photos along the way detailing this journey but things got a little hairy and no photos were taken. I am a hands on learning. Written instructions don't reach me like giving me a picture to follow. I read the details of this posing beanbag and cogitated while making sketches. Below is a list of what I hoped to create.
A flat top, round prop to be as close to the "real" thing as possible
2 bags inside filled with beans
Zipper in the side or bottom so the "sleeve" can be removed and washed
Something you must know before I get much further into this, is I am not a seamstress. I can sew and make basic things, but beyond that I'm out. I went to our new JoAnn's Fabric store in Clarksville and purchased two yards of black woven cotton fabric. It was the most sturdy cotton I could find. There I also bought a zipper. I then went to Miejers and purchased a bag of beanbag beans. I went home and got to work. I'm such a perfectionist that I mulled over several different ways to cut out my circle but opted for the longest way possible to insure a perfect circle. Here is my sketch paper. Not wanting to get my DSLR out while chasing after my little one, I took pictures with my pocket camera (Canon Powershot) so the quality isn't the greatest. **click to enlarge**
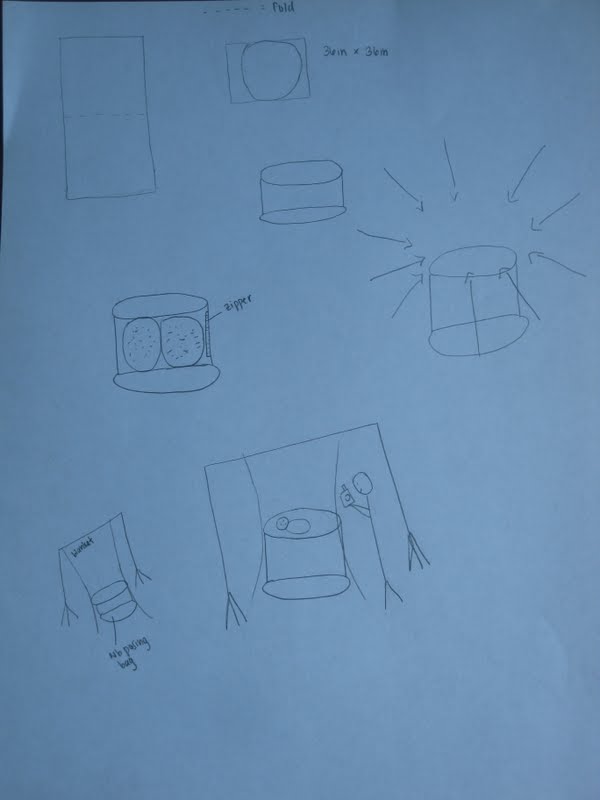
These drawings show a skeleton plan for making the bag, how it will be used and the access it would give me to the bambino/bambina.


After I cut the two circles, I then cut the rectangle that would connect the circles. I then set out to sew it all together. About 5-10% into the sewing part of the project, my sewing machine broke. Not wanting to abandon the project I continued to hand sew the bag for the next two nights. As I neared the end of the sewing, I decided I'd wait to add the zipper until I once again had a working sewing machine. I grabbed two (clean) trash bags and started the annoying process of filling it with beans. I took extreme measures to insure these beans that are a major chocking hazard wouldn't escape but they still did. Needless to say I ended up on all fours searching for any rogue beans so Jude wouldn't get them the next day and try to munch on them. Once I placed the first bag in I knew I didn't have enough beans. As I mentioned before I wanted this to remain as cheap as humanly possible so I didn't go get more beans. I left it as is and just bunched up the excess fabric. I'll tear apart what I hand sewed and will resew it once I can use the sewing machine. There's no way I'm redoing this by hand again!! To quickly sum this up I'll share less details. IT WORKED!! Below is a pull back image, along with what the actual photo looked like from my newborn shoot with Serenity.

My life is full of pro and con lists. So here is my pro and con list for this project.
Cons
- It took too many hours to mention without a dose of embarrassment. It would've taken less time had my sewing machine not broke.
- It does not have a leather or suede "sleeve" like the real one does.
- It's not perfect due to me making it haha!
Pros
- Cost: $25 (Savings of $82- does not count shipping costs)
- It worked!!
- Did I mention how much I saved?!
Overall I would say my DIY project was a success. I wish it looked better but I'm still pleased with how it turned out considering my lack of sewing skills. Will I one day want to buy the "real" thing? Probably so, but until then, I'll get as much use out of my posing bean bag as possible. To view the entire album where I used the posing bag cut and paste the link below into your address bar. You can also go back a few posts (S is for Serenity) to view the post.
http://www.facebook.com/media/set/?set=a.215893585116783.53784.100000884290765&l=7d281bd4d4
Keep an eye out for more prop posts to get an inside view of photography. Believe me, it's always more than just holding a camera and snapping pictures!
Amber
Updated images using this posing bag.


Please check out other Propology DIY posts!
**I recently started a prop shop & boutique, Foxtree Prop Shop & Boutique. At FPSB you will find affordable goodies (pixie bonnets, crowns, headbands and more) to affordably stock your prop collection. Please check out the Facebook page and click the "like" button. www.facebook.com/foxtreepropshopandboutique I just recently surpassed my first 100 fans and will be having a multivendor giveaway. Details coming soon so jump on board so you don't miss out!**
**I recently started a prop shop & boutique, Foxtree Prop Shop & Boutique. At FPSB you will find affordable goodies (pixie bonnets, crowns, headbands and more) to affordably stock your prop collection. Please check out the Facebook page and click the "like" button. www.facebook.com/foxtreepropshopandboutique I just recently surpassed my first 100 fans and will be having a multivendor giveaway. Details coming soon so jump on board so you don't miss out!**
6 comments:
Awesome! I'm the most frugal photographer around and have been looking into a Newborn nest for over a year and just recently decided that maybe I want to make this thing myself. Well with a sewing machine lol. You just inspired me to do so! I might get a cheap vinyl though for my material. Thank you for sharing this!!!
I thought for sure my comment went through way back in March but I just looked again and it didn't. Hmm...Anyway..if I had this project to do over I would've used cheap vinyl for sure. I'm curious, did you make one? I'd love to see a picture if you did. foxtreephotog@aol.com
Thanks so much for posting this! I need to get something for an upcoming first official newborn session and can't spend the $$ on expensive props and I was thinking of the exact same process - so glad to see that it works! I just looked around a bit and it looks like Joann sells vinyl, so I think I might try that, we'll see how it goes...
Hindsight is always 20/20. I would've done several things different. We didn't have a JoAnn's at the time. One of the things I would've changed was the fabric. Vinyl would've been the best bet for sure. With all that being said it worked wonderfully for me. I upgraded this year :)
I LOVE LOVE LOVE This post!!!! I've been debating making one of these myself, after endless hours of searching for one that was NOT $100! I need to price vinyl the next time that I go to JoAnn's.
You can make it out of any material but if you want it to be waterproof buy enough vinyl to cover the top or get a large heavy duty yard trash bag and stuff your puck in it:)
Post a Comment